
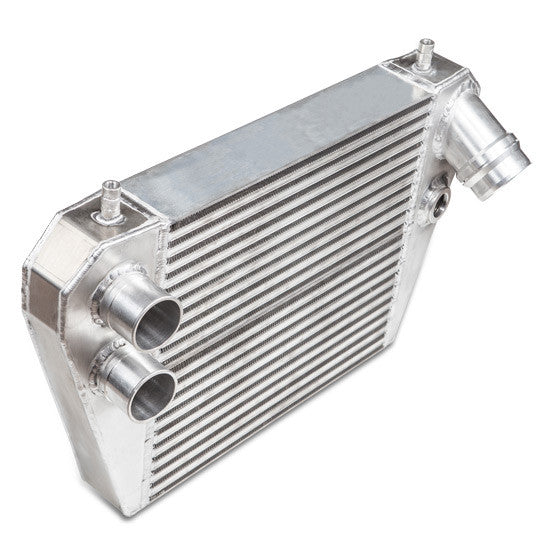


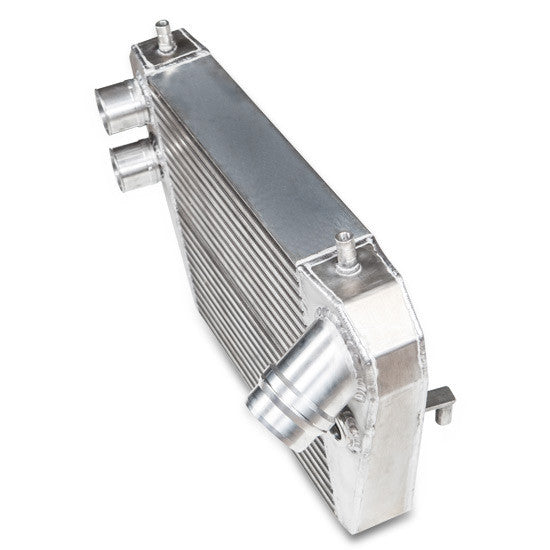
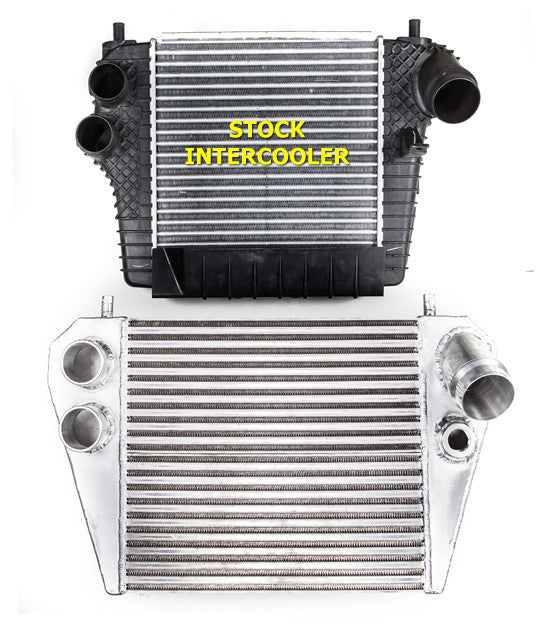
Garrett Front Mount Intercooler Upgrade, F150 V6 3.5L Ecoboost
1. Stock Intercooler takes only 4.5 minutes to MAX OUT the air intake temp on the gauge. 157 Deg F.
2. After 4.5 minutes on the upgraded intercooler, maximum air intake temp observed is only 118 Deg F.
3. After 5.5 minutes of continuous pulls, the upgraded intercooler only reaches maximum temperature of 132 Deg F. It takes 12 consecutive dyno pulls in third gear to do this.
4. It takes the stock intercooler only 3 pulls (only 55 seconds) to reach the same 132 Deg. F
Conclusion: It does not take very long to heat soak the stock intercooler. In this case, it only takes 3 pulls in 3rd gear (about the same as 1/4 mile through 4 gears).
*Testing done Back to Back while Truck was strapped to the dyno.
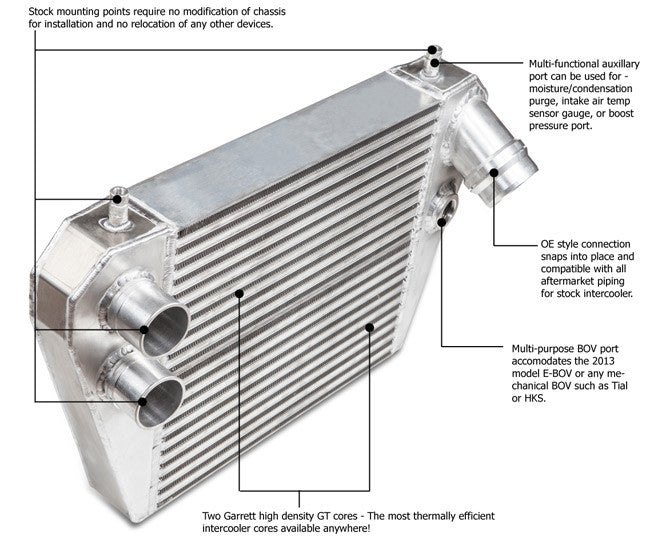
Front mounted intercooler upgrade. Direct replacement stock location unit. Garrett high density cores. Supports 800HP.
Installation Instructions:
1. Remove 2 bolts that hold the lower front bumper chin (air deflector) and remove the deflector. Head of bolt is 13mm.
2. With hood open, look down towards intercooler and remove the two bolts holding the top intercooler bracket to the intercooler. Head of bolt is 10mm. Save the bracket and the two grommets so you can install into the new intercooler.
3. Disconnect the air inlet and outlet plumbing from the intercooler in preparation for removing the stock intercooler from vehicle.
a. Loosen the two hose clamps on passenger side of intercooler. Head of bolt on clamp is 8mm. Pull the hoses off the intercooler and push it out of the way.
b. Use a sharp pick or small flathead screw driver to remove the locking ring on the driver side charge pipe at the intercooler. After the locking ring is removed, slide the pipe straight out and away from the intercooler. It's a nice snug o-ring fit but will slip right out. Push it out of the way.
c. If you have a 2013 model, disconnect the electrical plug from the E-BOV and disconnect the plastic recirculation pipe from the outlet of the black canister leading out of the E-BOV.
Make sure everything is free and prepare to lower the intercooler for removal.
To lower the intercooler and remove from vehicle, unbolt the two bolts holding the lower bracket to the intercooler via the two stub pins.
The intercooler will drop down and out once the lower bracket is removed. Be careful not to drop it.
Reinstallation is just reverse of removal, but make sure:
- you save the 4 rubber grommets from the stock intercooler (to the top and bottom mounting brackets – 2 on each) and slide them onto the new intercooler for proper cushioning once bolted down.
If you have a 2013 truck, the E-BOV can be removed from the black canister on the stock intercooler and bolted directly to the mounting flange on the new intercooler. You will vent to atmosphere. The 1.25" plug, hose, and 2 clamps are used to cap off the other end of the E-BOV recirculation hose at the intake once you remove the recirculation hose from vehicle during install (it's no longer needed).
Each intercooler comes with an optional quick access purge fitting with a -4 cap. If you want to use that just remove the 1/8" NPT plug from drain port hidden under the mounting stub pin at the bottom of the intercooler and replace it with the supplied fitting and make sure you tighten down the cap before driving the truck.
2. After 4.5 minutes on the upgraded intercooler, maximum air intake temp observed is only 118 Deg F.
3. After 5.5 minutes of continuous pulls, the upgraded intercooler only reaches maximum temperature of 132 Deg F. It takes 12 consecutive dyno pulls in third gear to do this.
4. It takes the stock intercooler only 3 pulls (only 55 seconds) to reach the same 132 Deg. F
Conclusion: It does not take very long to heat soak the stock intercooler. In this case, it only takes 3 pulls in 3rd gear (about the same as 1/4 mile through 4 gears).
*Testing done Back to Back while Truck was strapped to the dyno.
Front mounted intercooler upgrade. Direct replacement stock location unit. Garrett high density cores. Supports 800HP.
Installation Instructions:
1. Remove 2 bolts that hold the lower front bumper chin (air deflector) and remove the deflector. Head of bolt is 13mm.
2. With hood open, look down towards intercooler and remove the two bolts holding the top intercooler bracket to the intercooler. Head of bolt is 10mm. Save the bracket and the two grommets so you can install into the new intercooler.
3. Disconnect the air inlet and outlet plumbing from the intercooler in preparation for removing the stock intercooler from vehicle.
a. Loosen the two hose clamps on passenger side of intercooler. Head of bolt on clamp is 8mm. Pull the hoses off the intercooler and push it out of the way.
b. Use a sharp pick or small flathead screw driver to remove the locking ring on the driver side charge pipe at the intercooler. After the locking ring is removed, slide the pipe straight out and away from the intercooler. It's a nice snug o-ring fit but will slip right out. Push it out of the way.
c. If you have a 2013 model, disconnect the electrical plug from the E-BOV and disconnect the plastic recirculation pipe from the outlet of the black canister leading out of the E-BOV.
Make sure everything is free and prepare to lower the intercooler for removal.
To lower the intercooler and remove from vehicle, unbolt the two bolts holding the lower bracket to the intercooler via the two stub pins.
The intercooler will drop down and out once the lower bracket is removed. Be careful not to drop it.
Reinstallation is just reverse of removal, but make sure:
- you save the 4 rubber grommets from the stock intercooler (to the top and bottom mounting brackets – 2 on each) and slide them onto the new intercooler for proper cushioning once bolted down.
If you have a 2013 truck, the E-BOV can be removed from the black canister on the stock intercooler and bolted directly to the mounting flange on the new intercooler. You will vent to atmosphere. The 1.25" plug, hose, and 2 clamps are used to cap off the other end of the E-BOV recirculation hose at the intake once you remove the recirculation hose from vehicle during install (it's no longer needed).
Each intercooler comes with an optional quick access purge fitting with a -4 cap. If you want to use that just remove the 1/8" NPT plug from drain port hidden under the mounting stub pin at the bottom of the intercooler and replace it with the supplied fitting and make sure you tighten down the cap before driving the truck.